Jump to content


Photo
- - - - -

Thoughts on future basement electric brewery?


  • Please log in to reply
129 replies to this topic

#61 gnef

gnef

    Frequent Member

  • Members
  • PipPipPipPip
  • 2533 posts
  • LocationAtlanta

Posted 27 April 2016 - 09:43 PM

Trade some of that keg stockpile or beer to have some apprentice do it for you.

Ha! I already sold a number of kegs to fund my faucet and tubing upgrade (I upgraded all 14 faucets to Perlick 650ss faucets, John Guest fittings for the shank and disconnect, and Bev Seal Ultra 235 barrier line - that was an expensive upgrade!)


I actually do want to learn how to sweat copper well, it is just that since it is a new skill, I expect a certain failure rate. What I've learned so far is to dry the joint, clean all mating surfaces well, flux enough to cover surfaces, heat until the joint is hot enough to melt and wick the solder in without the flame on it.


The only thing that is different is with the valves, which I've seen that you actually heat the tubing first to get it to expand into the valve sweat cup before heating the the cup directly.


Also, I recall from somewhere that it is best not to have the copper pipe directly attached to the concrete, so I plan on attaching spare 2x4's to the concrete, and then strapping the copper pipe to the 2x4's. This is one reason why I need to carefully plan the routing of the piping, as I need to screw in the 2x4s to the cinder blocks first, and then measure, sweat, and attach. I also want to use the 2x4's because I will be using 1/2'' stainless valves for cold water distribution, and I need there to be enough clearance and support so that the use of the valves doesn't cause the nearest sweat joint to fail prematurely, and I don't rack my knuckles against the cinder blocks every time I want to attach tubing or something with the valves.


#62 BlKtRe

BlKtRe

    Comptroller of le Shartes

  • Members
  • PipPipPipPipPip
  • 16516 posts
  • LocationThe Land of Oz

Posted 28 April 2016 - 07:47 AM


I'm using propane, but on the test that I did, it had no problem getting the copper and fitting hot enough to flow the solder. My main mistake for the test was adding too much solder. I noticed solder flowing through the fitting, so I'll have to be a bit more judicious with the use of the solder. This will also be good since I plan on silver soldering the tri clamps to the kettles.


Again, I cant stress enough about using MAPP gas. MAPP is hotter and will heat the copper faster. When I used propane it took to long for the copper to heat and my flux would disappear. Once I switched to MAPP soldering became much easier and faster. Silver soldering is very similar. Again I used MAPP and a very high quality acid flux. 


#63 HVB

HVB

    No Life

  • Patron
  • PipPipPipPipPip
  • 18067 posts

Posted 28 April 2016 - 08:04 AM

The StillDragon order came today, and the bends in the ripple element are too severe to get through the element enclosure, so it looks like I'll have to stick with the straight elements for now. The good thing is I already bought a second one, so I just need to return the ripple now.


I've also put in the order for the fans. I am hoping the packages from China get here soon too so I can start to mock up how I want to have things set up.

You don's say :)


https://www.brews-br...wery/?p=2279663


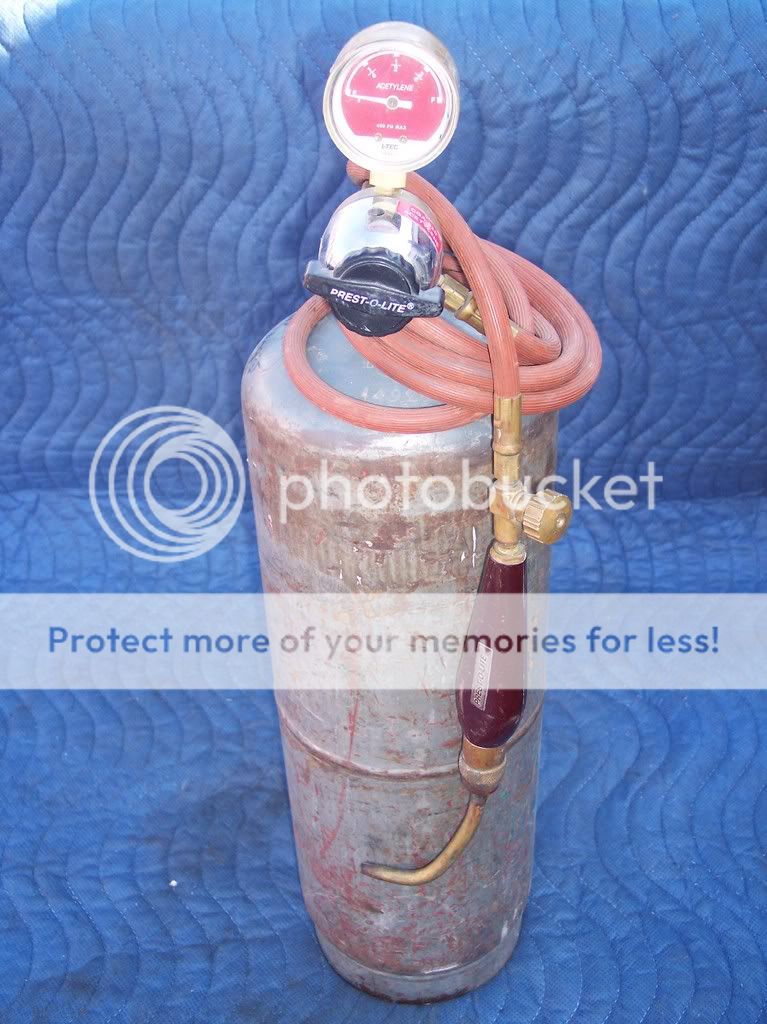
I use something like this for my soldering needs, both silver solder and 95/5, and have no issues.


101_3919.jpg


#64 gnef

gnef

    Frequent Member

  • Members
  • PipPipPipPip
  • 2533 posts
  • LocationAtlanta

Posted 28 April 2016 - 04:45 PM

Again, I cant stress enough about using MAPP gas. MAPP is hotter and will heat the copper faster. When I used propane it took to long for the copper to heat and my flux would disappear. Once I switched to MAPP soldering became much easier and faster. Silver soldering is very similar. Again I used MAPP and a very high quality acid flux. 

I'll definitely keep that in mind when I am doing my sweating, and if the propane becomes too troublesome, I'll definitely get the MAPP gas. Right now my plan is to sweat the copper from the end points to the splices, sorta backwards, which will give me practice before I splice in to the mainline.


You don's say :)


https://www.brews-br...wery/?p=2279663


I use something like this for my soldering needs, both silver solder and 95/5, and have no issues.


101_3919.jpg

Ha! You definitely got me there. I had done some searching after you said that, but I couldn't find anything. I really don't mind using straight elements, and the stilldragon option was the best value in my mind. The hot pod from brewhardware looked too fragile, and I saw complaints about the thinness of the stainless enclosure. The brewers hardware one looked very beefy, but it was much more expensive. I also wanted to use tri clamps for this connection, and did not want to put the element directly in to the kettle since I wanted to be able to easily remove the element to move the kettles or for cleaning.


Acetylene is way out of my league for what I am doing. I don't expect to sweat copper for a long time after I finish with this, so I don't really want to make too much of an investment into the equipment. I already have the propane torch, which is why I want to use that if I can, plus the test I did went fine, and I'll do another test later before I start doing the real work for this.


#65 djinkc

djinkc

    Comptroller of Non-Defending Defenders of Inarticulate Twats

  • Patron
  • PipPipPipPipPip
  • 32138 posts
  • Locationout the backdoor

Posted 28 April 2016 - 05:37 PM

I'm surprised the rippled element is a problem.  I have to force mine a bit when removing or replacing.  I feel better with the watts/sq in though - at least in the kettle.  I don't care for heating water.


#66 gnef

gnef

    Frequent Member

  • Members
  • PipPipPipPip
  • 2533 posts
  • LocationAtlanta

Posted 28 April 2016 - 08:51 PM

I'm surprised the rippled element is a problem.  I have to force mine a bit when removing or replacing.  I feel better with the watts/sq in though - at least in the kettle.  I don't care for heating water.

Yea, that is why I originally bought the ripple for the BK. The enclosure is more important to me, so I'm just going to go with the straight element. Maybe I'll just need to be more careful on getting it up to a boil, as I think 5500 watts is too much to keep a boil going, and I would be throttling it anyway once it got to a boil.


#67 dondewey

dondewey

    No Life

  • Members
  • PipPipPipPipPip
  • 11651 posts
  • LocationVA

Posted 01 May 2016 - 11:07 AM

There was a question on fans for ssrs on heat sinks. Mine are mounted horizontally, not desired, so I used the one of the unused functions and output relays on my kettle controller drive a 120V fan if the temperature recorded via a thermocouple wedged in the heat sink got over 90. It never did, so I dropped that temp to 80 just so I could use my cool fan.

You can do this really cheap if you buy on eBay. My biggest expenses were the twist lock plugs and spa sub panel. Everything else major was surplus. My controllers are like 1500 new each and I got both for under a hundred.

Edited by dondewey, 01 May 2016 - 11:08 AM.


#68 gnef

gnef

    Frequent Member

  • Members
  • PipPipPipPip
  • 2533 posts
  • LocationAtlanta

Posted 01 May 2016 - 07:35 PM

I have the 240v fans on the way to me, so I plan on mounting them as exhaust fans with screens to keep out debri.


My costs have already soared, but that is due to a lot of the peripheral stuff I am including in this project. I got an air hose reel to relocate my air compressor (came out to $155), putting in a sink down there (nearly $200 for the sink, plus the plumbing for it), and I've been getting a lot of small hardware items that just add up really quickly (I've had to buy a number of different sizes of masonry screws, which I've been getting 100 at a time off amazon when I can, plus a bunch of short home depot runs), plus I had to run over 70 ft of the 6/3 cable - I think I've spent around $300 just on wire.


I almost have everything in to me, though I still have the stainless valves coming from China that haven't had a change in tracking for over a week. I still need to drill the holes in the kettles to silver solder the tri clamp fittings, and get the 240v fans so that I can start to mock up the control panels. I don't want to do any cutting yet until I have everything I need for the control panels and can move things around to see how it will be inside the panel. I am also working on the vent hood right now, and I hope to have that completed soon.


#69 gnef

gnef

    Frequent Member

  • Members
  • PipPipPipPip
  • 2533 posts
  • LocationAtlanta

Posted 03 May 2016 - 11:03 PM

I thought I'd update with some progress. I've been working on this little by little. I've got some other projects that I am trying to also work on, so I need to split my time, plus I need to finish the other projects to free up some space in this area too.


Here is when I was wiring the infrasture:

26805904795_1b142fc4df_k.jpg


Here is another view later on with things more mocked up with where I will want them:

26534034850_e8761d1ff9_k.jpg


Here is the 6" inline centrifugal fan mounted:

26805894545_768038b212_k.jpg


Here is the vent hood attached:

26534029130_6200b04248_k.jpg


Here I am mocking up where I want components inside the HLT control panel:

26805899685_550acb386b_k.jpg


I still need to cut the holes in the kettles and silver solder the tri clamps in, cut and wire up the control panels (I'm going to do the HLT first and run a test), and I still need to do all the plumbing, but I'm still waiting on the valves, and lumber from my other project is also in the way. Honestly, the plumbing is a lower priority right now, so it may be a while before I tackle it, even after I get the valves in.


#70 BlKtRe

BlKtRe

    Comptroller of le Shartes

  • Members
  • PipPipPipPipPip
  • 16516 posts
  • LocationThe Land of Oz

Posted 04 May 2016 - 05:44 AM

That looks sweet. Someday you need to let us know about your processes and what all the switches do. Also, Im wondering if the heat sink on the SSR would be better suited mounted on the outside of the box instead of the inside. With that said, it looks difficult to mount it outside. 


EDIT: I just now saw the fan. I have a dual Love Box with no fans and the heat sink mounted on the outside. Zero heating issues. 


#71 HVB

HVB

    No Life

  • Patron
  • PipPipPipPipPip
  • 18067 posts

Posted 04 May 2016 - 06:24 AM

any info on your hood?  Did you make that?


#72 gnef

gnef

    Frequent Member

  • Members
  • PipPipPipPip
  • 2533 posts
  • LocationAtlanta

Posted 04 May 2016 - 08:49 AM

That looks sweet. Someday you need to let us know about your processes and what all the switches do. Also, Im wondering if the heat sink on the SSR would be better suited mounted on the outside of the box instead of the inside. With that said, it looks difficult to mount it outside. 


EDIT: I just now saw the fan. I have a dual Love Box with no fans and the heat sink mounted on the outside. Zero heating issues. 

The two separate switches with thick power cords going in to them are the switches for the HLT and BK control panels (I liked doing this over contactors inside the control panel, just personal preference), Then the switch with the white romex cable coming out of it is for the wall mounted grain mill. The switch with the vertical EMT conduit going up is for the vent hood, and the switch next that will control the two outlets to the very right which will have the sump pump plugged in to it to recirculate ice water during chilling. The last two switches in the two-gang box are for two pumps - I only have one pump now, but I wanted to build this so that I could easily add another one if desired. I really do like the subpanel method for myself; I am much more comfortable with household wiring as I have done it before, it gives me greater flexibility to add or change things down the road, and the switches and outlets are fairly cheap!


edit - I've also left enough room so that if I want to build another boil kettle control panel, I can just wire it into the subpanel, and another wall switch, and then I can run two boil kettles after finishing with the HLT (I have a 120 qt cooler that I have as my mash tun for big beers or big volume beers, and this would allow me to do both boils simultaneously later on. I wanted to keep those costs to just what I needed for now)


any info on your hood?  Did you make that?

Yup, I constructed my hood out of materials I already had. I like how it turned out. I bought the metal a long time ago from home depot as a top cover for my top bar beehives when my bees were alive, and this was for future hives if mine swarmed, but my bees died in 2012. I just cut it to length. The end pieces are just part of a 2x12 I had around and cut an acute angle to make sure it sloped downwards on both sides. I used short deck screws to attach it, a jigsaw to cut the vent hole, and a 6 inch flange to affix the vent piping between the vent piping and the vent fan. The only things I had to purchase were the lag eye screws, eye bolts, and turnbuckles, so not too bad cost-wise!


Edited by gnef, 04 May 2016 - 08:50 AM.


#73 HVB

HVB

    No Life

  • Patron
  • PipPipPipPipPip
  • 18067 posts

Posted 04 May 2016 - 12:36 PM

Any worries about the steam/condensation on the electrical panel and equipment?


#74 SchwanzBrewer

SchwanzBrewer

    Grand Duke of Inappropriate Announcements

  • Patron
  • PipPipPipPipPip
  • 34299 posts
  • LocationKnee deep in business plans

Posted 04 May 2016 - 01:12 PM

Looking good!


#75 gnef

gnef

    Frequent Member

  • Members
  • PipPipPipPip
  • 2533 posts
  • LocationAtlanta

Posted 04 May 2016 - 02:45 PM

Any worries about the steam/condensation on the electrical panel and equipment?

I'm really not worried about it, as the vent hood will be going full bore, and it moves a lot of air. I do expect some condensation inside the fan, but that should drip safely, I've checked the clearance. I will have everything on the GFCI in the main panel as well for safety.


Looking good!

Thanks!


#76 HVB

HVB

    No Life

  • Patron
  • PipPipPipPipPip
  • 18067 posts

Posted 04 May 2016 - 03:51 PM

Yeah, those fans do move some air, I have one just like that.

Keep the work up.

#77 gnef

gnef

    Frequent Member

  • Members
  • PipPipPipPip
  • 2533 posts
  • LocationAtlanta

Posted 04 May 2016 - 04:37 PM

Well, today I cut the 1 7/8 hole and silver soldered the tri clamp ferrule for the element. It took me three tries to get it so that it wouldn't leak, and it looks pretty ugly, but I am pretty sure it is leak free now. I'll do another test to double check though. I also have another silver solder kit on the way, as I went through way too much of the solder from the first kit.


The frustrating part was that due to the size of the tri clamp, by the time you finish flowing the solder on one side, the flux has boiled off on the other, so you need to add more, but it spatters immediately when you put it on due to the high temperature.


When I do the boil kettle, I think I'll only do half of the fitting first, let it cool, then add more flux to the other side, then finish the soldering. I think that will make it easier to be able to get a good bead all the way around.


#78 HVB

HVB

    No Life

  • Patron
  • PipPipPipPipPip
  • 18067 posts

Posted 05 May 2016 - 05:04 AM

Maybe it was the extra mass of the kegs but the 3 I have solder on to my fermetners went really easy, no issues like you had. 


#79 gnef

gnef

    Frequent Member

  • Members
  • PipPipPipPip
  • 2533 posts
  • LocationAtlanta

Posted 05 May 2016 - 09:03 AM

It could also definitely be me! This was my first try at silver soldering and using liquid flux. I did notice that the flux boiled sooner than the joint was hot enough to flow the solder. I may not have been quick enough to get all around. We'll see how the next one goes once I get the next kit in.


#80 gnef

gnef

    Frequent Member

  • Members
  • PipPipPipPip
  • 2533 posts
  • LocationAtlanta

Posted 05 May 2016 - 10:43 PM

Well, I've made a bit more progress. I finally wired up the main panel with the 50 amp GFCI circuit breaker: 

26777658221_3821a18f5e_k.jpg

That was really nerve racking for me though, as working in the main panel is always scary to me even though I've learned what to do and not to do, and how to work in the panel while it is live. Still scary.


So that I could do a quick test of my wiring for the HLT control panel:

26810963266_03c17ea45c_k.jpg


I still need to cut out the front of the HLT control panel to fit the temperature controller, and solder the wires for the fan on top, but I wanted to check my wiring for the control panel and the element.


Some things learned so far: 

1. When I actually brew, I must always use the pump with the HLT to limit stratification. After the water hit the set point, the temperature drifter another 5 degrees due to the placement of the temp sensor at the periphery of the HLT. I don't think a pump will completely reduce the delay, but if I can anticipate it, I can set the temperature controller to a degree or two below my actual desired temp. I'll have to play around with this though.


2. The SSR I have has a loose connection on the control side, so I need to get that replaced. It still worked well enough for me, but I want to replace it so I can trust what is inside the box.


3. The wiring seems complicated at first, but after staring at things for a while, it gradually made more sense, and by the time I felt comfortable, I was able to get it right the first time I fired things up. I can't imagine trying to do this in a traditional control panel though.


4. My HLT is leak free. I'll leave the water in it overnight, and then look for leaks tomorrow, but I feel pretty good about it now.


I may go ahead and start working on the control panel for the boil kettle too, though I'll need to do more soldering with the rheostat for the stilldragon kit. 


Once I get the silver soldering kit in, I'll go ahead and work on the boil kettle to get the tri clamp installed, and I hope by then, I'll have all the electrical ready so I can do a test on that. 


After that, it will just be all the plumbing that I need to do. I still need to decide on where I want the cold water lines to go for the valves (one for the water filter, one with a camlock to flush, and one for a garden hose for general cleaning, and another line for the cold water line to the sink I'll be adding).


I'm actually progressing a lot faster than I expected, though I have been slower on some other projects that I had originally wanted to finish before the electric brewery. haha.


0 user(s) are reading this topic

0 members, 0 guests, 0 anonymous users