Jump to content


Photo
- - - - -

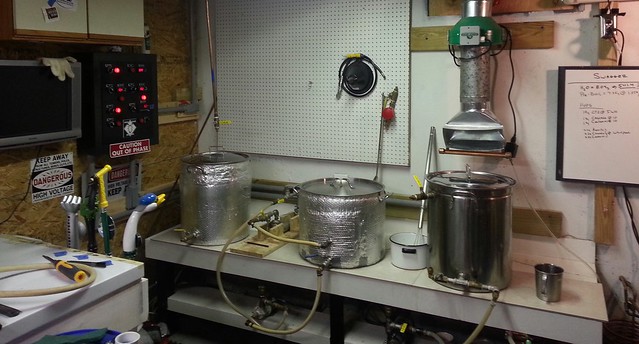
My Electric Brewery Build


  • Please log in to reply
267 replies to this topic

#1 matt6150

matt6150

    Moderately Accelerated Member

  • Patron
  • PipPipPipPipPip
  • 10549 posts
  • LocationMooresville, NC

Posted 02 June 2013 - 11:35 AM

Well this has been years in the making but I'm determined to get it done this year. Time and money have put it off to the side but I've collected enough parts that I'm almost there. The first step was getting the brew room finished. I have 9x22 room in my poolhouse, which is a converted horse barn, that I will try and contain everything. I did the plumbing and electrical years ago as well digging out over a foot deep of dirt so I could hang joists and put in a rough cut pine floor. I'm doing the whole room in rough cut pine. The two end walls were already done and a few years ago I started doing another wall and got about 1/3 of the way up and ran out of wood. So in the mean time I have been using the room as is to store all my equipment and brew out of. Fast forward a few years till now and I finally finished all the walls in rough cut. Picked up a truck full last week and been working on it all this week. I got a few pics below as it is today. A few years ago a friend bought a foreclosed house and it came with a bunch of used stainless restaurant shelving. So I got all those for free. The sink was a craigslist find for $75. I'm going to go and start putting everything back in now.

Posted Image


Posted Image


This last pic is where the electric system will go. I got one more of those large stainless shelves that is 90" long that I'm going to cut out the center support then build a stand for. You can see the panel I put in and the 50amp plug for the control panel. The outlet up top with the dimmer switch will be for a exhaust fan.

Posted Image


Edited by matt6150, 29 January 2014 - 06:18 PM.


#2 Jdtirado

Jdtirado

    Comptroller of Betties & Crocs

  • Members
  • PipPipPipPip
  • 2162 posts
  • LocationVirginia

Posted 02 June 2013 - 11:58 AM

Dude this is freaking awesome!!!!!  I am going to save my pennies and hire you.


#3 Humperdink

Humperdink

    Cose

  • In Memorium
  • PipPipPipPipPip
  • 15798 posts

Posted 02 June 2013 - 03:50 PM

Hell yeah, looking forward to following this to the conclusion


#4 Hines

Hines

    Comptroller of Emus

  • Members
  • PipPipPipPip
  • 9744 posts

Posted 02 June 2013 - 07:48 PM

That's incredible Matt....you engineer types...never know what you will do next!


#5 DieselGopher

DieselGopher

    Executive Director of Whatnot and what not

  • Patron
  • PipPipPipPipPip
  • 14157 posts
  • Locationhanging around

Posted 02 June 2013 - 09:14 PM

Looking good man!! Keep us posted as it progresses for sure.

#6 Clintama

Clintama

    No Life

  • Banned
  • PipPipPipPipPip
  • 30244 posts
  • LocationRight Here

Posted 03 June 2013 - 09:40 AM

Nice! Once you go electric, you'll never go back to gas.


#7 HVB

HVB

    No Life

  • Patron
  • PipPipPipPipPip
  • 18067 posts

Posted 03 June 2013 - 10:09 AM

Looks good!  Can not wait to see how it all comes out.


#8 MtnBrewer

MtnBrewer

    Skynet Architect

  • Moderators
  • PipPipPipPip
  • 6695 posts
  • LocationThe Springs

Posted 04 June 2013 - 07:50 AM

Very nice work! Keep us posted on your progress. :cheers:

#9 ChefLamont

ChefLamont

    Comptroller of Fear

  • Members
  • PipPipPipPip
  • 9728 posts
  • LocationAtlanta

Posted 04 June 2013 - 08:13 AM

Wow.  That looks great so far.


#10 brewman

brewman

    Canyon Chin King of Chicago

  • Patron
  • PipPipPipPipPip
  • 13080 posts
  • LocationFlorida Everglades

Posted 04 June 2013 - 08:19 AM

Wow very nice.  Carlos could use it as a sauna.


Dan


#11 positiveContact

positiveContact

    Anti-Brag Queen

  • Patron
  • PipPipPipPipPipPip
  • 68886 posts
  • LocationLimbo

Posted 04 June 2013 - 08:26 AM

Wow very nice.  Carlos could use it as a sauna.


Dan


indeed - where is the hood?


#12 matt6150

matt6150

    Moderately Accelerated Member

  • Patron
  • PipPipPipPipPip
  • 10549 posts
  • LocationMooresville, NC

Posted 04 June 2013 - 07:04 PM


indeed - where is the hood?

Hood is coming.


So I whipped this stand up today. I got a few clothing racks a few years ago from a friend when they remodeled the store she worked at. All threaded pipe. I took them all apart and reworked the pieces. I did have to cut a few down to make it all work but we have a pipe threader at work so I just re-threaded them and viola! Totally free, even got the leveling pads from work. Now I'm a little torn on the height I built it at. From floor to top of where the table top will be is 40" add in the kettle height of 18" and the top of the kettle will be 58" off the floor. It doesn't seem to bad (I'm 6'0") but now would be the time to fix it. It wouldn't be the end of the world but I would have to take the stand back apart. Anybody have any thoughts? What are everybody else's dimensions?


Posted Image


Edited by matt6150, 29 January 2014 - 06:19 PM.


#13 EWW

EWW

    Regular, normal human being

  • Patron
  • PipPipPipPipPip
  • 26154 posts
  • LocationSomewhere special

Posted 04 June 2013 - 09:30 PM

Seems a bit high to me but looks great - personally I'd like the top of the tallest vessel around nipple level so I could easily mash in and see in every vessel.Did you have to reverse thread some of that pipe to get it to fit together like that?

#14 matt6150

matt6150

    Moderately Accelerated Member

  • Patron
  • PipPipPipPipPip
  • 10549 posts
  • LocationMooresville, NC

Posted 05 June 2013 - 04:35 AM

Seems a bit high to me but looks great - personally I'd like the top of the tallest vessel around nipple level so I could easily mash in and see in every vessel.Did you have to reverse thread some of that pipe to get it to fit together like that?

The 4 longest uprights have a left handed thread at one end. They came like that so all I did was cut and re-thread the end with the normal threads. The horizontal pieces that join the two halves together I turned down on one end so it would slide into the tee fitting and just welded it. Other than that it's all normal thread.


Oh and I measured and the top of the kettles are about 5" above nipple height currently. I can still see inside easily but could be easier.


#15 HVB

HVB

    No Life

  • Patron
  • PipPipPipPipPip
  • 18067 posts

Posted 05 June 2013 - 05:06 AM

I went low with mine.  The table height is 22.75" and it is 38.75 to the top of my MLT and 43.5 to the top of my BK and HLT.  I wanted a comfortable height. 


Only picture I could find.


Posted Image


#16 BlKtRe

BlKtRe

    Comptroller of le Shartes

  • Members
  • PipPipPipPipPip
  • 16515 posts
  • LocationThe Land of Oz

Posted 05 June 2013 - 06:15 AM

Fantastic! 


#17 matt6150

matt6150

    Moderately Accelerated Member

  • Patron
  • PipPipPipPipPip
  • 10549 posts
  • LocationMooresville, NC

Posted 05 June 2013 - 07:32 AM

I went low with mine.  The table height is 22.75" and it is 38.75 to the top of my MLT and 43.5 to the top of my BK and HLT.  I wanted a comfortable height. 


Only picture I could find.


Posted Image

Wow, that really is low. I think for me that might be too low for comfort. Seems there would be to much reaching/looking down for valves and such.


I will probably cut mine down, but I'm thinking only around 6" or so.


Hey Mtn, you got a height to the top of your kettles, they looked kinda high?


#18 HVB

HVB

    No Life

  • Patron
  • PipPipPipPipPip
  • 18067 posts

Posted 05 June 2013 - 07:51 AM

Wow, that really is low. I think for me that might be too low for comfort. Seems there would be to much reaching/looking down for valves and such.


I will probably cut mine down, but I'm thinking only around 6" or so.


Hey Mtn, you got a height to the top of your kettles, they looked kinda high?


Does not feel that low to me but I can see your point about the valves.  This was the third revisions and this one came out perfect for me. 


ETA- the valves on the pumps are not used much.  The one on the left is usually open and the on and off for flow is controlled by the valve on the RIMS.


Edited by drez77, 05 June 2013 - 07:54 AM.


#19 MyaCullen

MyaCullen

    Cheap Blue Meanie

  • Patron
  • PipPipPipPipPipPip
  • 68757 posts
  • LocationSpokane, WA

Posted 05 June 2013 - 09:01 AM

very very nice!


#20 matt6150

matt6150

    Moderately Accelerated Member

  • Patron
  • PipPipPipPipPip
  • 10549 posts
  • LocationMooresville, NC

Posted 09 June 2013 - 05:36 PM

Ok got some work done this weekend. I cut my stand down by 6". I think it's going to be perfect now, about 34" to the top of the table now. I built a shelve for the bottom where I will mount the pumps. I also built a upper support for the stainless shelve to rest on.


Posted Image


I had a buddy of mine shear me up a couple pieces of stainless I then screwed to the wall for a back splash, total cost $40. Then bolted up the shelve to the wall after some leveling.


Posted Image


Finally the pots for some visual progress!


Posted Image


Edited by matt6150, 29 January 2014 - 06:21 PM.


0 user(s) are reading this topic

0 members, 0 guests, 0 anonymous users